Introducing the Vectorize API
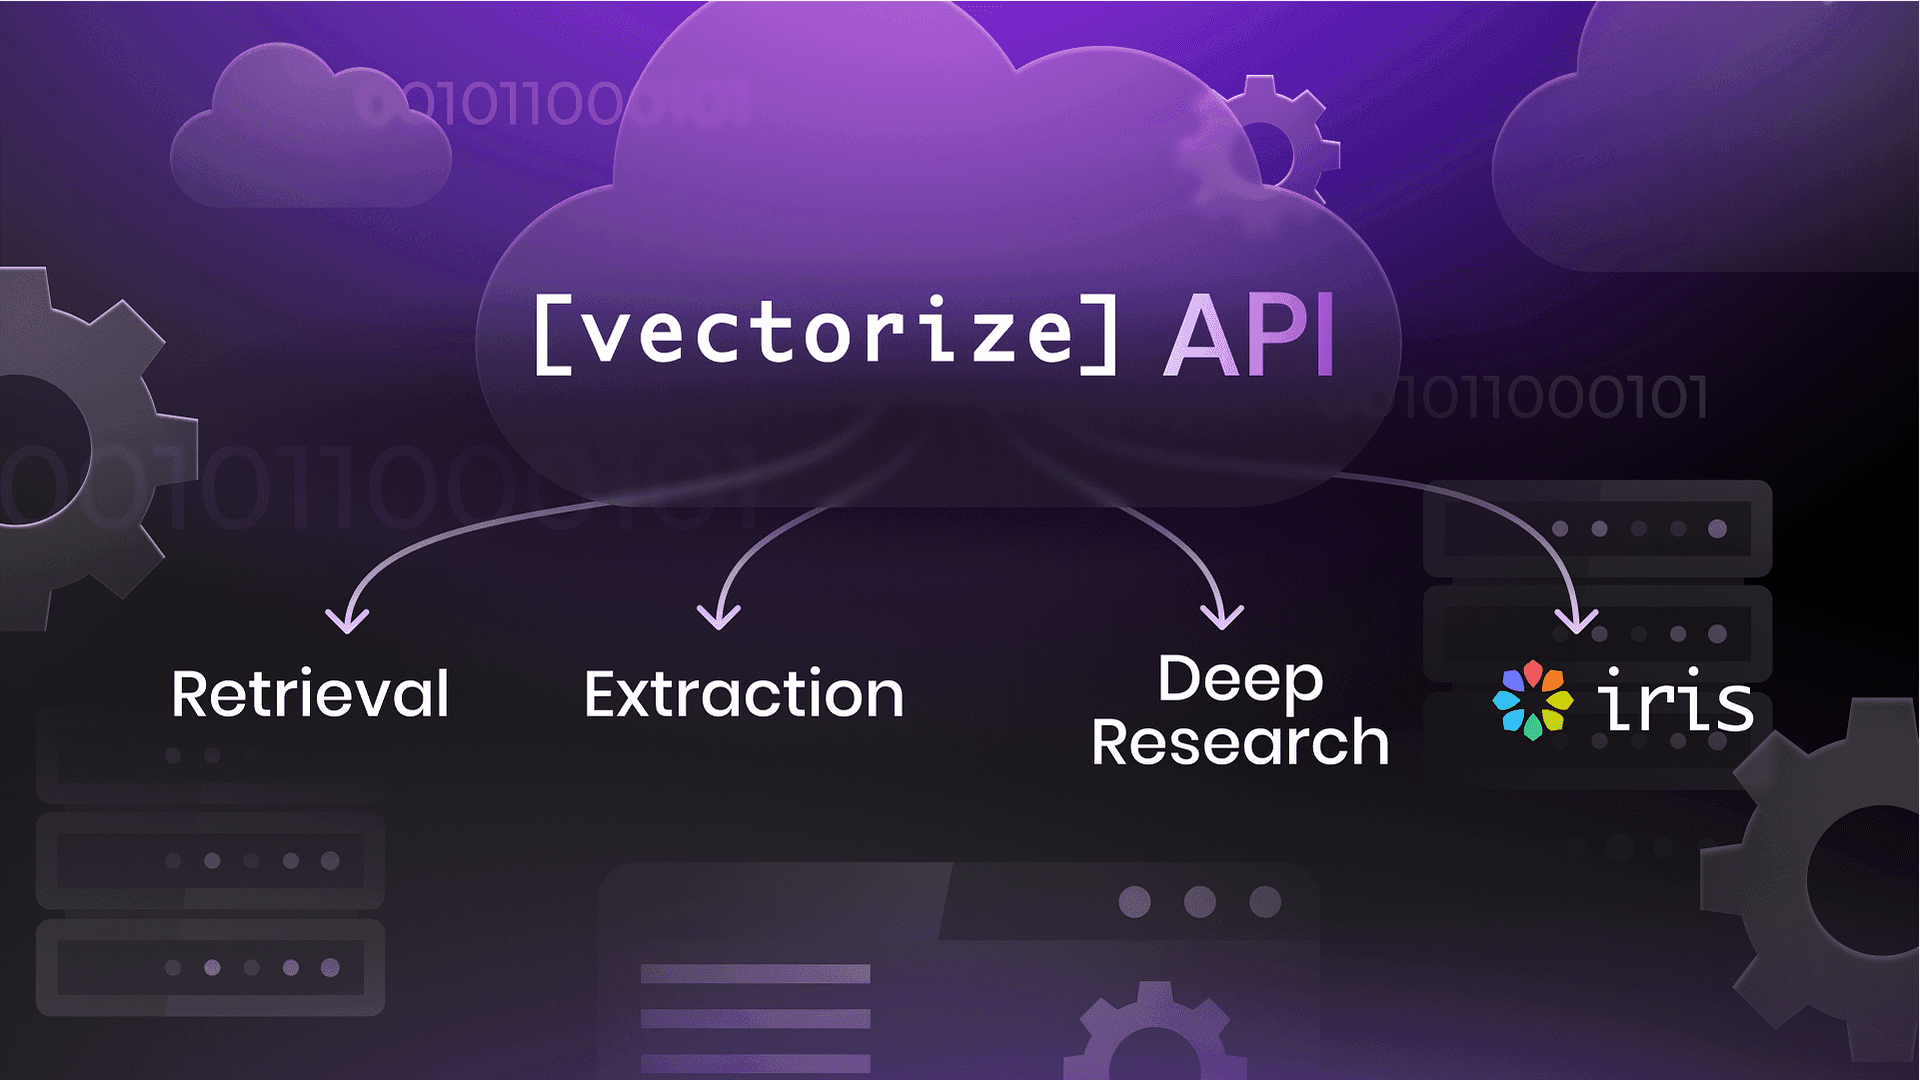
We’re excited to announce the Vectorize API Beta, designed to power agentic applications with automated data ingestion, vector search, structured text extraction, and private deep research.
With the Vectorize API, you can:
- Automate data ingestion from structured and unstructured sources
- Perform high-performance vector search across your data, including advanced RAG techniques as query rewriting, metadata filtering, re-ranking, and so on.
- Automate generation of Private Deep Research based on data ingested by a RAG Pipeline, including optional structured output and Web Search
- Extract structured text from any document—PDFs, documents, images, or text files using Vectorize Iris
This API enables developers to build autonomous AI-powered apps that understand and retrieve data efficiently.
In this guide, we’ll walk through how to use the Vectorize API step-by-step in Python, so you can start integrating these capabilities into your applications. The same capabilities are available via Node.js or any HTTP client.
Connecting to the Vectorize API
Before using the Vectorize API, follow these steps to set up authentication and start building.
Step 1: Create a Vectorize Account & Get Your Access Token
- Sign up for a free Vectorize account here
- Generate an access token in the Access Token section
- Gather your organization ID. From the browser url, extract the UUID from the URL after /organization/
Step 2: Install the Vectorize client using pip
Make sure Python 3.8+ is installed, then run the pip install command:
pip install vectorize-client --upgradeStep 3: Connect to the API
Now, let’s set up authentication by exporting the organization ID and access token as environment variables:
export VECTORIZE_ORG_ID="your-organization-id"
export VECTORIZE_API_TOKEN="your-api-token"
If using Windows (PowerShell):
$env:VECTORIZE_ORG_ID="your-organization-id"
$env:VECTORIZE_API_TOKEN="your-api-token"
Now initialize the API client:
import os
import vectorize_client as v

# Load credentials from environment variables
org = os.getenv("VECTORIZE_ORG_ID")
access_token = os.getenv("VECTORIZE_API_TOKEN")

# Initialize API client
api = v.ApiClient(v.Configuration(access_token=access_token))
You’re now connected! 🎉
Text extraction using Vectorize Iris
Vectorize Iris is an model-based extraction solution that simplifies text retrieval from PDFs, images, and handwritten documents. It preserves structure and semantics, ensuring clean, accurate text output.
Why Iris?
- Extracts text while maintaining semantic document structure
- Handles PDFs with embedded images and handwritten content
- Accurately parses complex tables
Iris is available via the Extraction API.
Step 1: Load your file
First, we need to load the document we want to extract text from.
from pathlib import Path
import urllib3, os
files_api = v.FilesApi(api)
# set a different content type if your file is not a pdf
content_type="application/pdf"
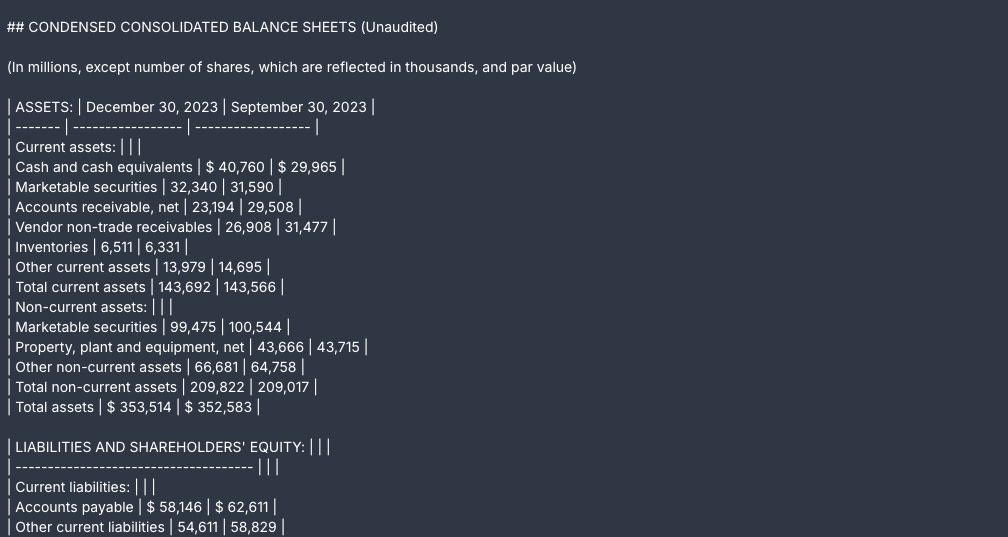
file_path="path/to/file.pdf"In this tutorial, we’re using a public Apple financial report.
Step 2: Start the extraction
Now, we upload the file to Vectorize and start an extraction request.
start_file_upload_response = files_api.start_file_upload(org, start_file_upload_request=v.StartFileUploadRequest(
    content_type=content_type,
    name="My file.pdf",
))

http = urllib3.PoolManager()
with open(file_path, "rb") as f:
    response = http.request("PUT", start_file_upload_response.upload_url, body=f, headers={"Content-Type": "application/pdf", "Content-Length": str(os.path.getsize(file_path))})
    if response.status != 200:
        print("Upload failed: ", response.data)
    else:
        print("Upload successful")

extraction_api = v.ExtractionApi(api)
response = extraction_api.start_extraction(org, start_extraction_request=v.StartExtractionRequest(
        file_id=start_file_upload_response.file_id
))
extraction_id = response.extraction_id
Step 3: Get the extraction result
Once we have an extraction ID, we poll the API until the process is complete.
while True:
    response = extraction_api.get_extraction_result(org, extraction_id)
    if response.ready:
        if response.data.success:
            print(response.data.text)
        else:
            print("Extraction failed: ", response.data.error)
        break
    print("Not ready yet")
The extracted text is always in Markdown format, optimized for Iris chunking and agentic applications. The extraction also splits the chunks as if it would do before writing to the vector database. You can access it via response.data.chunks.
Create a RAG Pipeline and ingest a local file
A RAG pipeline enhances LLM-powered applications by enabling efficient document retrieval based on semantic meaning. With Vectorize, you can quickly ingest any file, convert them into vector embeddings, and query them for relevant context.
In this section, we’ll deploy a pipeline that ingests a local file into Vectorize using the API, making it ready for retrieval.
Step 1: Create a File Upload Source Connector
To ingest a local file, we must first create a File Upload connector. This acts as the entry point for our data.
connectors_api = v.ConnectorsApi(api)
response = connectors_api.create_source_connector(org, [{
        "type": "FILE_UPLOAD",
        "name": "From API"
    }])
source_connector_id = response.connectors[0].id
This connector allows you to upload files, which will then be processed and stored for vector search.
Step 2: Upload the File
Now, we upload the file to the connector.
import urllib3, json, os

file_path = "path/to/file.pdf"

http = urllib3.PoolManager()
uploads_api = v.UploadsApi(api)
metadata = {"created-from-api": True}

upload_response = uploads_api.start_file_upload_to_connector(
        org, source_connector_id, v.StartFileUploadToConnectorRequest(
            name=file_path.split("/")[-1],
            content_type="application/pdf",
            # add additional metadata that will be stored along with each chunk in the vector database
            metadata=json.dumps(metadata))
)

with open(file_path, "rb") as f:
    response = http.request("PUT", upload_response.upload_url, body=f, headers={"Content-Type": "application/pdf", "Content-Length": str(os.path.getsize(file_path))})

if response.status != 200:
    print("Upload failed: ", response.data)
else:
    print("Upload successful")
The file metadata can be stored along with each chunk, making it easier to filter and retrieve later.
Once the pipeline is started, it will vectorize the file content into the vector database.
Step 3: Connect to the AI Platform and Vector Database
Vectorize includes a built-in AI platform and vector database, so we retrieve their IDs to use them in the pipeline.
You can also use your own AI platform and vector database, creating the related connectors.
ai_platforms = connectors_api.get_ai_platform_connectors(org)
builtin_ai_platform = [c.id for c in ai_platforms.ai_platform_connectors if c.type == "VECTORIZE"][0]

vector_databases = connectors_api.get_destination_connectors(org)
builtin_vector_db = [c.id for c in vector_databases.destination_connectors if c.type == "VECTORIZE"][0]
These components handle embedding generation and vector storage.
Step 4: Configure and Deploy the Pipeline
Now, we define the pipeline by linking:
- The source connector (that contains the file we just uploaded)
- The extraction and chunking strategy (to parse and chunk the files)
- The AI platform (to generate embeddings)
- The Vector Database (to store and search embeddings)
response = pipelines.create_pipeline(org, v.PipelineConfigurationSchema(
    source_connectors=[v.SourceConnectorSchema(id=source_connector_id, type="FILE_UPLOAD", config={})],
    destination_connector=v.DestinationConnectorSchema(id=builtin_vector_db, type="VECTORIZE", config={}),
    ai_platform=v.AIPlatformSchema(id=builtin_ai_platform, type="VECTORIZE", config={}),
    pipeline_name="My Pipeline From API",
    schedule=v.ScheduleSchema(type="manual")
))
pipeline_id = response.data.id
Done! 🚀
Once deployed, the pipeline automatically processes and ingests the document, making it searchable using the retrieval endpoint.
Vector Search
Once you’ve ingested your documents into Vectorize, you can retrieve relevant information using vector search.
To perform a vector search, we first need to know which pipeline to query.
Then we call the retrieval endpoint to perform the search:
pipelines = v.PipelinesApi(api)
response = pipelines.retrieve_documents(org, pipeline_id, v.RetrieveDocumentsRequest(
    question="Generic question?",
    num_results=5,
))
print(response.documents)
Make sure to change the question with something related to your document.
The system will return the top-ranked relevant documents based on semantic similarity:
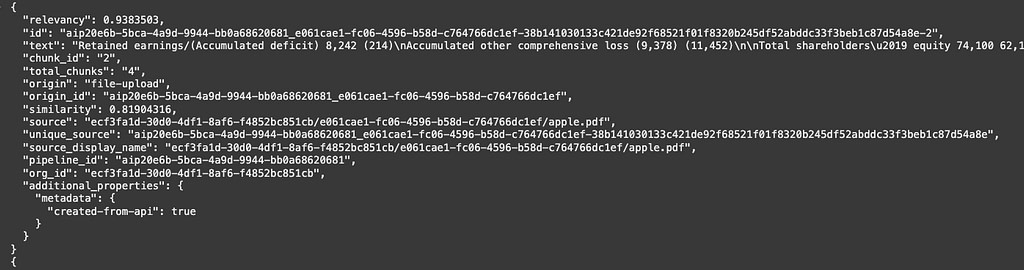
By default, cross-encoding re-ranking is enabled, you can find the relevance score for each documents and aggregated metrics as NDCG and average relevancy in the response.
If you want to filter by user-defined metadata, you can set the metadata filters in the query
response = pipelines.retrieve_documents(org, pipeline_id, v.RetrieveDocumentsRequest(
    question="Apple Shareholders equity",
    num_results=5,
    metadata_filters=[{"created-from-api": True}]

))
More advanced techniques of retrieval are ready out of the box, like query rewriting for a conversational agent. Check them out in the official documentation.
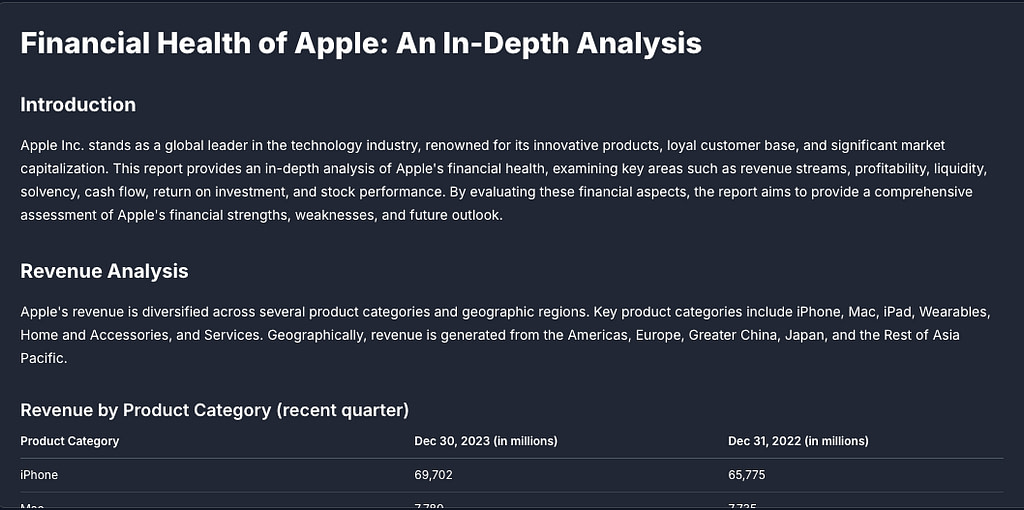
Deep Research
With Vectorize, you can go beyond simple retrieval and perform Private Deep Research on your ingested data. This allows your application to generate in-depth summaries and insights based on private documents, with the option to extend the research to external sources.
Before starting a deep research, you need to identify which pipeline to use.
Then, ask Vectorize to begin the deep research:
pipelines_api = v.PipelinesApi(api)
response = pipelines.start_deep_research(org, pipeline_id, v.StartDeepResearchRequest(
        # make sure to include a relevant prompt here
        query="Generate a report with insights about the financial health of Apple",
        # optionally enable additional search on the web
        web_search=False,
))
research_id = response.research_id
Web search can also be enabled to include online data.
Since research takes time, we poll the API until the results are ready.
while True:
    response = pipelines.get_deep_research_result(org, pipeline_id, research_id)
    if response.ready:
        if response.data.success:
            print(response.data.markdown)
        else:
            print("Deep Research failed: ", response.data.error)
        break
    print("not ready")
Once completed, the deep research output is provided in Markdown format.
Checkout the Deep Research documentation to learn more.
What’s Next
We’re committed to continuously improving the API, and would love your feedback.
Try Vectorize API Today
The API is fully available for all Vectorize customers on ths Starter and Pro plans. Retrieval and extraction are also available on the Free plan.
See the API documentation to learn more.