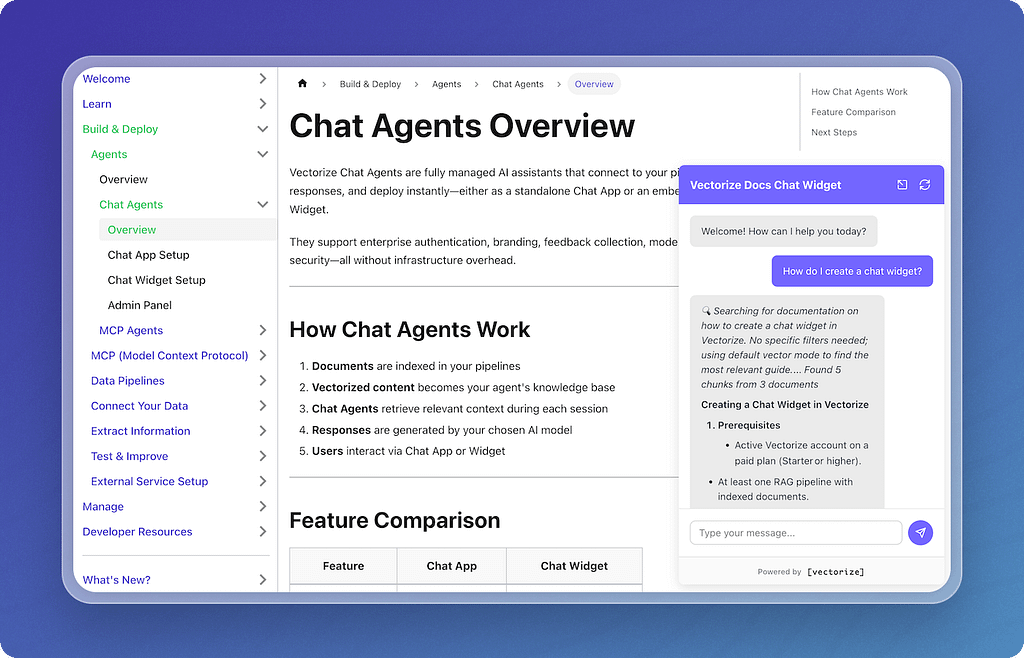
The Vectorize Docs Just Got Conversational

Where better to put the Vectorize chat widget than in our own docs?
Docs are where the questions happen:
- “How do I connect my RAG pipeline to an agent?”
- “Can I embed this chat agent into my own app?”
- “How do I configure an agent tool?”
A search bar can help, but it’s limited. A chat agent trained on our docs gives you answers in context — without breaking your flow or opening a new tab.
How We Set It Up in Our Docs
The chat widget is only as good as the data behind it, so the first thing we did was create a new pipeline for our documentation. Once the docs were ingested and indexed, the rest of the setup was straightforward.
Step 1: Creating the agent
With the pipeline ready, the next move was to give it an agent — the piece that turns raw data into conversation. We created a new agent of type Chat Widget, and gave it a straightforward name (we used “Vectorize Docs Support”) so the team would know exactly what it was for.

Step 2: Choosing a model
Since this widget would face users directly, we picked a reliable model we already trusted in production. We went with Groq’s GPT OSS 120B, which we’ve been using a lot lately. In fact, we like so much we’ve set it as the default for all Vectorize chat agents (although of course you can use different models).
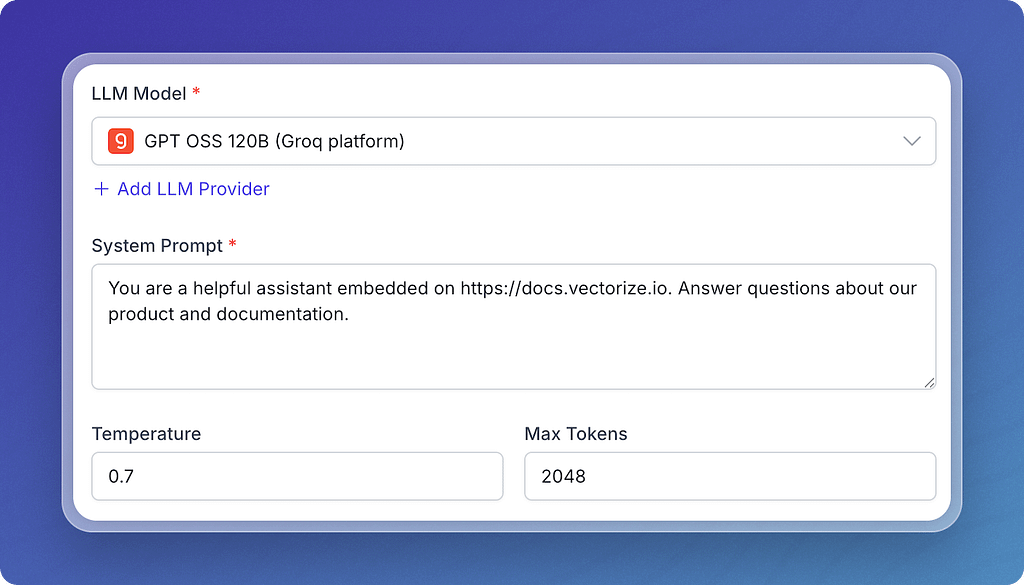
Step 3: Writing the system prompt
We wrote a short, focused system prompt:
“You are a helpful assistant embedded on https://docs.vectorize.io. Answer questions about our product and documentation. Be concise. Provide the user with URLs to the relevant documentation.”
The idea wasn’t to replace the docs — just to make them easier to navigate.
The prompt can be changed in the widget’s admin panel without redeploying, so we can easily adjust it and have changes show up live in the widget right away.
Step 4: Connecting the agent to our pipeline via an agent tool
In the Agent Tools section, we clicked New Agent Tool, gave it a name, and selected our docs pipeline. We kept the description simple (“Retrieve answers from the Vectorize docs”) and saved.

Step 5: Testing the chat agent
With the tool connected, we jumped into the Admin Panel to preview the agent. We configured the placeholder questions and changed the colors to match our branding. There are lots of additional options here – you can set language preferences, modify the prompt, set security policies, and more.

Step 6: Embedding the snippet
The last step was making it visible to users. We copied the script snippet from the Integration tab, dropped it into the docs site, hit deploy… and shazam! There it was!
What Changed Once It Was Live
- Questions get answered faster. Instead of jumping between pages, users can ask directly in the widget.
- Support load drops. Many common questions (“How do I add branding to my chat widget?”) get handled by the agent.
- We use our own product daily. Every docs update flows straight into the agent — so we see freshness in action.
Instead of digging through multiple pages, readers now get their questions answered and are pointed straight to the right place. And every docs update we publish flows into the pipeline automatically, so the widget stays fresh without extra effort.
Try It Yourself
You can try the chat widget right now — it’s live on our Vectorize docs.
If you want to add one to your own site, follow the setup guide. It’ll take you less time than reading this post.